
Master the Polymer Clay Bargello Technique: Step-by-Step Guide for Crafty Creators
If you're looking for a unique way to take your polymer clay projects to the next level, then it's time to dive into the Clay Bargello technique. Known for its mesmerizing geometric patterns, Bargello offers endless possibilities to showcase your creative flair, and it's surprisingly easy to achieve with polymer clay! In this post, we’ll walk you through everything you need to know about this eye-catching technique and how to incorporate it into your projects. Whether you’re making jewelry, home decor, or art pieces, this technique will help you stand out.
What Is the Polymer Clay Bargello Technique? The Bargello technique is traditionally a type of needlepoint embroidery that uses zigzag or flame-like patterns. In polymer clay, the technique is adapted by creating a repeating pattern that plays with layers of color and design. Think of it as a way to bring dimensionality and movement into your clay projects—perfect for earrings, pendants, and even large decorative pieces.
The beauty of polymer clay Bargello is its versatility. You can create complex designs with just a few tools, and by incorporating materials like mica powders and glitter, you can give your projects a dazzling finish that catches the light.
Watch the Bargello Technique in Action on YouTube! I highly recommend checking out my step-by-step YouTube tutorial on how to create stunning Bargello patterns with polymer clay. In this video, I walk you through the entire process, offering pro tips and creative inspiration along the way. You can watch the full video here at the bottom of this page!
What You'll Need To create your own polymer clay Bargello project, you’ll need just a few basic tools and materials:
- Polymer Clay in Multiple Colors: Choose contrasting or complementary colors to help your Bargello pattern stand out. If you follow my technique below, you only need one because the colors come from surface effects.
- A Sharp Blade: A high-quality blade is essential for creating clean, precise cuts. Get your blade here.
- Mica Powders: Add shimmer and depth to your clay with mica powders. You can find a great selection here at CreateAlong.
- Glitter: Add some sparkle to your project with glitter, available here.
- Pasta Machine (optional): While not essential, a pasta machine helps to condition your clay evenly and create thin, even sheets. I highly recommend the Atlas or Imperia with motor- here's mine.
Step-by-Step Bargello Technique for Polymer Clay
Step 1: Prepare Your Clay First, you’ll want to condition your polymer clay by kneading it until it’s soft and pliable. This step is crucial for avoiding cracks or breakage later on. If you’re using multiple colors, condition each color separately. Once conditioned, roll each color into thin sheets of the same thickness. Using a pasta machine is a great way to achieve uniform thickness quickly.
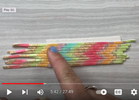
Step 2: Layer the Clay by sheeting it -the colored sheets of clay next to each other. Press them gently so they adhere without trapping air bubbles. The number of colors and sheets you use depends on how complex you want your pattern to be—more layers will create a more intricate Bargello pattern.
Step 3: Make the Cuts Now for the fun part! Using your sharp blade, slice the layered clay vertically into strips of equal width. The precision of your cuts is key to getting that perfect Bargello pattern, so make sure to keep your blade straight.
Step 4: Create the Pattern Take the strips you’ve just cut and begin arranging them in a staggered pattern. This is where the magic happens! Move each strip slightly up or down to create that signature zigzag or wave-like effect. You can experiment with the arrangement to achieve different styles of Bargello—try more dramatic shifts for a bolder look or subtle shifts for a more delicate design.
Step 5: Add Mica and Glitter: as I did in my video, you can make your colors on the surface to add some sparkle! Both mica and glitter can really make your Bargello pattern pop, especially when the light hits it just right. You can find a wide range of mica powders and glitter at CreateAlong.
Step 6: Cut and Shape With your Bargello pattern complete, you can now use your clay sheet to cut out shapes for your project. Whether you’re making pendants, earrings, or a decorative object, now is the time to use your creativity. Use cutters or freehand your shapes to make your project unique.
Step 7: Bake and Finish Bake your clay pieces according to the instructions on your polymer clay package—typically around 275°F for 15-30 minutes, depending on the thickness of your project. Once baked, let them cool before handling.
For an extra polished finish, consider sanding your edges or adding a glossy glaze to seal your work.
Pro Tips for Perfecting the Bargello Technique
Experiment with Colors: Don’t be afraid to play with bold, contrasting colors for a dramatic effect, or opt for pastels for a softer, more delicate design.
Use a good blade that stays stiff: To achieve crisp, clean cuts, regularly clean your blade with a wipe to remove any clay residue that can cause jagged edges, and choose a blade that has less wiggle, like our Blue Steel Blade.
Use Mica Sparingly: A little mica powder goes a long way! Lightly dust your clay for a shimmering effect without overpowering the design.
Take Your Time: Bargello requires precision, so don’t rush the cutting or arranging process. Patience will lead to stunning results.
Practice Makes Perfect: Like any polymer clay technique, the more you practice, the better your results will be. Don’t get discouraged if your first attempt isn’t perfect—just keep experimenting!
Need a pasta machine? This one is a good option: https://amzn.to/3ZS6nuV
Watch our polymer clay bargello free tutorial here:
Tags
More Projects

-

-

How to Make a Charming Daisy Polymer Clay Bookmark - Make it Monday
How to Make a Charming Daisy Polymer Clay Bookmark - Make it Monday -

How-to Create a jar with a fitted lid from polymer clay idea tutorial
How-to Create a jar with a fitted lid from polymer clay idea tutorial -

How To Make Dangle Earrings with Open Centers - Make it Monday
How To Make Dangle Earrings with Open Centers - Make it Monday -

How to Cover a Journal with Polymer Clay - It's Make it Monday
How to Cover a Journal with Polymer Clay - It's Make it Monday


